
Dance Barre Check: Height, Grip, and Shared Space
On this page
Quick answer
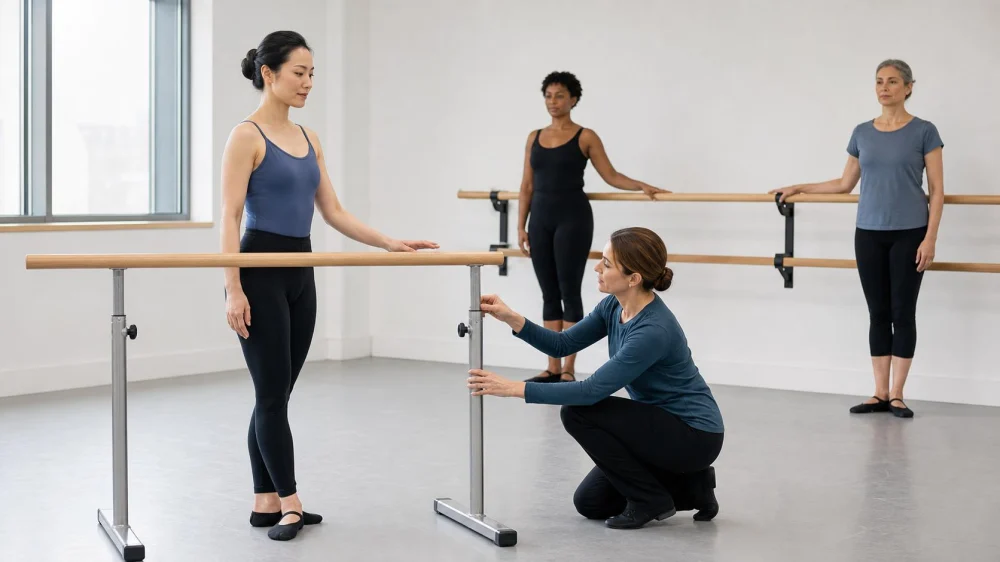
Before barre work, confirm the barre is stable, the floor is clear and dry, and dancers have enough room for the assigned leg and arm pathways. Stand at the distance and orientation your teacher gives, use a light supportive hand rather than hanging or pulling, and keep the wrist and shoulder comfortable. Stop if the barre shifts, a bracket loosens, or spacing becomes unsafe.
This checklist is for dance students in U.S. studios. Barre height, side, grip, turnout, movement range, and adaptations depend on the class, dancer, equipment, and teacher.

Dance King Entertainment / dance king studios leesburg
LeesburgLoudoun CountyVirginia
26 W Market St, Leesburg, VA 20176, USA
What the barre is for
A dance barre provides external support while a dancer learns or refines alignment, balance, coordination, and movement patterns. It is not meant to hold the dancer's full body weight during ordinary standing exercises unless an instructor or rehabilitation professional has prescribed a supported adaptation.
The working relationship should be active: the standing leg, trunk, and whole body continue organizing balance while the hand receives light feedback. Excessive downward pressure or pulling can change alignment and make movement at centre feel very different.
Different styles use the barre differently. Ballet, conditioning, rehabilitation, and fitness classes may assign distinct positions and loads. Follow the current instructor instead of carrying a habit from another class into a new exercise.

Inwood Performing Arts Co / inwood performing arts
InwoodBerkeley CountyWest Virginia
2297 Henshaw Rd, Inwood, WV 25428, USA
Check stability and space
- Look at the floor. Remove bags, bottles, warm-up layers, loose rosin, moisture, and other trip or slip hazards.
- Check the barre visually. Report a loose bracket, cracked rail, exposed fastener, wobbling base, damaged foot, or splinter.
- Test only as directed. Apply gentle hand contact before class movement; do not shake, hang from, sit on, or climb the barre.
- Map the movement zone. Allow space for front, side, and back leg pathways, arm positions, turns, and direction changes.
- Check nearby objects. Mirrors, walls, windows, radiators, speakers, portable bases, and another dancer can limit range.
Tell the teacher immediately if equipment moves or the assigned spacing cannot contain the choreography. Do not wedge the barre with a bag, stack material under a foot, or tighten studio hardware without authorization.
Choose position, height, and grip
Stand close enough to make light contact without lifting the shoulder, leaning sideways, twisting the trunk, or locking the elbow. The teacher may adjust distance for arm length, exercise, mobility, or a double-barre setup.
- Rest the hand rather than clamping the thumb and fingers.
- Keep the wrist in a comfortable line instead of sharply bent.
- Allow the elbow and shoulder to respond naturally to movement.
- Avoid pushing down to force balance or pulling to create turnout or leg height.
- Reset the feet and torso before changing sides.
If the available height makes the shoulder rise or body lean, ask for another section, an adjustable barre, a different orientation, or an approved adaptation. “Standard height” does not fit every body or task.
Share the barre safely
- Confirm which way the line faces and which hand starts on the barre.
- Stagger positions when the teacher directs so legs do not meet in front, side, or back pathways.
- Keep personal items away from both sides of the rail.
- Use the assigned movement size; do not add a larger développé, grand battement, or arm sweep in limited space.
- Make eye contact or speak before changing places, passing behind, or joining an open spot.
- Stop in control if spacing closes or another dancer loses balance.
Do not reserve excessive rail space with towels or gear. If the class is crowded, let the teacher arrange lines, sides, and group rotations.
Portable and home barre notes
A portable barre needs the assembly, floor type, base orientation, height adjustment, fastener checks, weight limits, and maintenance specified by its manufacturer. Place it only where every foot sits flat and movement will not push it toward stairs, glass, furniture, or another person.
A chair, countertop, windowsill, rolling rack, or lightweight furniture is not automatically a safe substitute. It may slide, tip, break, be too high, or encourage a poor grip. Ask the teacher what home support is acceptable for the specific exercise.
Home video changes perspective. Keep the device outside the travel path, verify the teacher can see enough of the body when feedback is needed, and reduce movement size to fit the real room rather than the camera frame.
Limits, pain, and access needs
Barre support does not make an exercise appropriate for every injury, recovery stage, pregnancy, balance condition, or mobility need. Tell the teacher about relevant restrictions and follow individualized guidance from a qualified health professional.
Stop for sharp or increasing pain, dizziness, numbness, loss of balance, or a joint that feels unstable. Do not use stronger grip or greater pressure to work through a warning sign.
Seated barre work, a second hand, a different rail height, reduced range, slower tempo, or more space may be useful adaptations when thoughtfully taught. The dancer and instructor should agree on the setup before the combination begins.
Frequently asked questions
How high should a ballet barre be?
There is no single useful number for every dancer and exercise. Use the studio setup and teacher's guidance, and ask for adjustment if the height forces the shoulder up, wrist sharply bent, or torso off centre.
Should I grip with my thumb around the barre?
Schools may teach hand placement differently. The consistent principle is light, comfortable contact without squeezing, hanging, or pulling. Follow your teacher's demonstration.
Can I lean on the barre for balance?
The barre provides support, but routine technique generally calls for active balance rather than resting body weight on it. An adaptation may intentionally use more support under professional guidance.
What if the portable barre wobbles?
Stop using it. Keep others away and tell the instructor or owner. Do not improvise a shim or continue with smaller movements.
How much space do I need?
Enough for the full assigned leg and arm path in every direction without contact. Test slowly and let the teacher reduce range or reorganize positions when space is limited.
Sources and evidence notes
This guide treats the barre as external support for learning movement, not a structure to hang from. The International Association for Dance Medicine & Science discusses the educational role of barre work and the effect of pressure through the supporting arm in its resource paper on motor learning and teaching dance. Individual technique and adaptations still belong with the dancer's teacher and health team.
Next steps
At your next class, check the floor, rail, brackets or bases, and movement space before taking position. Ask the teacher to confirm distance, hand, and grip for the first exercise. Use the lightest support that preserves the assigned alignment, and report any equipment movement immediately.



 Taylor Academy of Fine Arts5.0 (2 reviews)
 Fred Astaire Dance Studios - River Oaks4.0 (55 reviews)
 Rosewood Arts Center4.0 (71 reviews)
 Texas Elks Lodge4.0 (60 reviews)
 Boehm Ballet Academy of Dance3.0 (2 reviews)
 St. Matthew's Conservatory of Classical Dance5.0 (4 reviews)
 My Story of First Time Performing in a Large Theater — The Big Night
 The Best Apps for Finding Local Dance Events and Socials
 How I Built My Home Dance Space — Setup, Mistakes & Tips
 My Story of Dancing at a Wedding (Guest & Performer) — Lessons Learned
 My Journey of Learning House Dance After Years of Studio Work — What Shifted
 The Connection Between Dance and Cultural Appreciation – Exploring Dance's Role in Understanding Global Cultures