
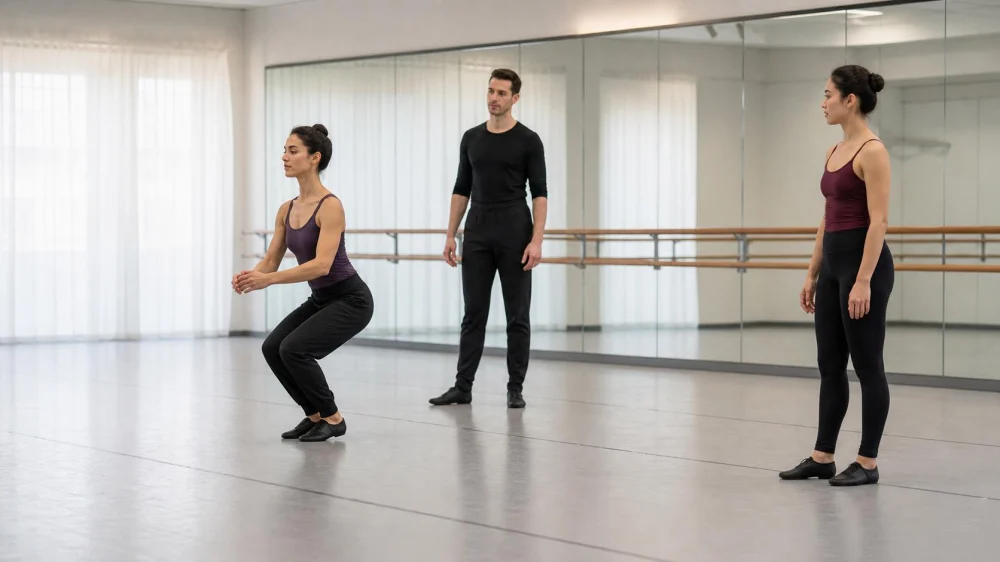
Dance Jump Landings: Build Quiet Control Before Height
A successful dance jump does not end at the top. The landing must manage momentum, preserve alignment, fit the choreography, and leave the dancer ready for the next count. Training quiet, repeatable landings at low height gives a teacher useful information before elevation, speed, travel, or complex arm patterns are added.
Quick answer
Learn jump and landing mechanics from a qualified dance teacher in the style being trained. Begin with small two-foot jumps in a neutral or teacher-specified position. Use an appropriate plié before takeoff, keep the jump within controlled range, meet the floor through the teacher-taught foot sequence, allow the ankles, knees, and hips to bend, maintain alignment, and finish in balance. Quiet sound can be a useful cue, but it is not proof of safe technique. Stop when pain, unstable alignment, or fatigue changes the landing.
The Little Gym of Katy / gymnastics katy tx
23010 Highland Knolls Dr A, Katy, TX 77494, USA
Check the conditions first
Use a sprung or otherwise dance-appropriate floor approved for the class. Check that it is clean, dry, continuous, and free from tape edges, gaps, grit, props, bags, and cables. Footwear must match the style and floor; socks on a slick surface or street shoes on a studio floor can change traction abruptly.
Allow enough space for takeoff, the airborne path, landing, recovery, and accidental travel. Dancers should not jump toward mirrors, barres, walls, speakers, or another group. Establish traffic direction and wait for the preceding dancer to clear.
Warm up through the teacher’s planned sequence. Landing practice is not a substitute for general preparation, technique foundations, strength, or recovery after an injury.
Bella Ballerina / bella ballerina leesburg
LeesburgLoudoun CountyVirginia
1053 Edwards Ferry Rd NE, Leesburg, VA 20176, USA
Understand the landing sequence
A landing is a coordinated deceleration rather than a sudden stop. The foot meets the floor according to the style and step, and the lower-limb joints bend to manage force while the torso remains organized. The precise use of the forefoot, heel, turnout, parallel alignment, and plié varies across ballet, jazz, contemporary, hip-hop, tap, and other forms.
Do not force the heel down or hold it up based on a single generic cue. The International Association for Dance Medicine & Science notes the value of using plié and full-foot mechanics in jump preparation and landing, while its pedagogy resources also caution that forced heel-contact wording can produce unintended results. Teacher observation of the whole movement matters.
The landing should connect into the next movement. A dancer who freezes, takes an extra step, swings the arms unexpectedly, or lets the torso collapse may be using a jump that is not yet controlled.
Coordinate foot, knee, hip, and trunk
Follow the teacher’s alignment for the chosen position. In general, the knee should track consistently with the foot rather than collapsing inward or twisting away. The pelvis and trunk should remain responsive without excessive arching, pitching forward, or leaning to save balance.
Turnout comes from the dancer’s available technique and structure, not from wrenching the feet farther apart on landing. Reduce turnout, height, or travel if alignment cannot be maintained. Never have another person push the knees or feet into position.
Arms affect momentum. Practice first with a simple port de bras or neutral arm position, then add choreography. The head and focus should follow the style without delaying awareness of the floor or nearby dancers.
Use a low-to-high progression
- Rehearse plié and return without leaving the floor.
- Practice a tiny two-foot takeoff and landing in place.
- Pause in the finished landing to check balance and alignment.
- Add a sequence of a few identical low jumps with full recovery.
- Introduce arm timing or direction while keeping height modest.
- Add travel, turns, single-leg landings, or complex combinations only under instruction.
Change one demand at a time. Higher elevation, faster tempo, more repetitions, a new surface, unfamiliar shoes, and a directional change should not all arrive in the same drill.
Use sound and video carefully
A heavy slap or thud can alert a dancer and teacher to review the landing, but quietness alone can be misleading. Someone can land quietly while the knees collapse, the torso shifts, or the feet use the wrong technique. Pair sound with visual and physical cues from the teacher.
Short video can reveal repeated patterns when the studio and everyone recorded have consented. Place the camera outside traffic and do not let a dancer watch the screen while jumping. Review a small number of repetitions and choose one change to practice.
Useful observations include whether takeoff and landing use the intended foot positions, whether both sides share load as expected, whether the dancer travels unintentionally, and whether the recovery fits the music.
Adjust for fatigue and repetition
Landing quality often changes before a dancer feels completely exhausted. Watch for increasing noise, shorter plié, delayed timing, inward knee movement, extra steps, reduced elevation, breathlessness, or difficulty following cues.
Use planned rest and rotate groups so the floor stays clear. Stop the set when technique deteriorates instead of adding “just one more” high repetition. A smaller number of observed, well-spaced landings may teach more than a long unmonitored series.
Track total jump demand across class, rehearsal, performance, and outside training. New choreography and hard floors can change load even when class duration stays the same.
Stop for pain or loss of control
Stop jumping for sharp, increasing, localized, catching, unstable, or persistent pain; swelling; a pop; numbness; inability to bear weight; or a fall. Do not repeatedly test an injury with another jump.
Report symptoms to the teacher and follow the studio’s incident plan. A qualified healthcare professional should assess significant or continuing symptoms. Emergency care is needed for an obvious deformity, severe bleeding, loss of consciousness, head or neck injury concerns, or another emergency.
Returning after injury may require changes to jump height, volume, surface, shoes, and choreography. Clearance to attend class does not automatically mean every jump is appropriate.
Frequently asked questions
Does a quiet landing mean it is correct?
No. Sound is one clue. Alignment, joint coordination, balance, style, and recovery also need teacher assessment.
Should every landing use the same foot pattern?
No. The sequence varies by dance style, jump, shoes, floor, and choreography. Follow the teacher’s method.
When should I add height?
After low jumps remain repeatable through takeoff, landing, and recovery without pain or alignment loss.
Can I practice jumps on concrete at home?
Do not improvise high-impact practice on a hard or unsuitable surface. Ask the teacher for a safe home alternative.
Next steps
Ask your teacher to watch a small set of low jumps from the front and side. Confirm the intended foot sequence, plié, alignment, arm timing, and recovery. Keep the cue that improves consistency, then progress only one variable at a time.
For additional dance-science context, see the IADMS article Heels Down During Jumps—Technique or Physics?.


 Golden Palace Dance Company0.0 (0 reviews)
 Allison's Dance Academy - Rock Valley4.0 (10 reviews)
 Shake it with Kelly Zumba Fitness4.0 (3 reviews)
 Vibe Performing Arts4.0 (8 reviews)
 Rise MVMT Studio4.0 (10 reviews)
 Foley Academy of Irish Dance5.0 (7 reviews)
 Dance Class With Live Music: Listen for Cues, Tempo, and Phrasing
 How I Learned to Use Virtual Reality Audiences in My Dance Shows — My Story
 How to Track Your Dance Progress Beyond Just Learning Routines
 How I Built My Home Dance Space — Setup, Mistakes & Tips
 How I Learned to Use Drone Footage in My Dance Video — My Story
 10 Benefits of Taking Dance Classes That Go Beyond Just Learning Moves