
Dance Shoe Care: Clean Soles, Dry Interiors, and Pack Pairs Separately
Dance shoes collect sweat, floor dust, rosin, street grit, and pressure in specific places. Throwing every pair into one closed bag can transfer dirt, trap moisture, and hide wear until class begins. A simple after-class routine protects shoe materials, studio floors, and the fit you rely on.
Identify the Shoe Material
Write down the shoe type, upper, sole, lining, finish, and manufacturer care instructions. Canvas, leather, satin, suede, rubber, and specialized pointe materials respond differently to water, heat, brushes, and cleaners. Do not copy a cleaning video for a visually similar shoe. Ask the teacher or fitter when the exact material or intended floor is unclear.

EMC Performing Arts Studio / emc performing arts
New FreedomYork CountyPennsylvania
101 W Main St, New Freedom, PA 17349, USA
Follow Floor Rules
Use indoor dance shoes only on approved surfaces and change before walking outdoors or through wet lobbies. Some studios restrict rosin, water, powder, floor wax, or certain rubber soles. Do not add a traction product without permission. What improves grip for one shoe can leave residue that creates a slip or damage for the next class.
Steps of Faith Dance Studio / steps of faith celina
695 N Preston Rd Ste 180, Celina, TX 75009, USA
Inspect After Class
In good light, check the sole, toe, heel, shank, platform, seams, elastic, ribbon, buckle, and lining. Look for smooth patches, lifting layers, cracks, exposed fasteners, stretching, odour, dampness, and asymmetrical wear. Note any blister or pressure point. Do not keep dancing to see whether a loose heel or sole becomes worse.
Clean Soles Correctly
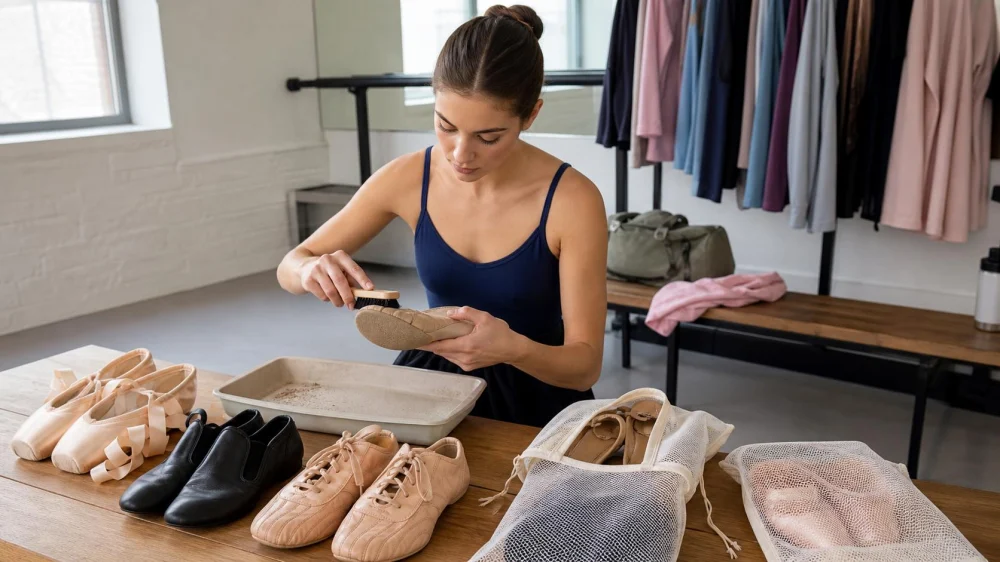
Remove loose dust using the tool and direction approved for that sole. Keep street grit out of suede brushes and shoe bags. Do not soak, scrape aggressively, or use household chemicals. A wire brush may be suitable for some suede soles under guidance but damaging or dangerous for other materials. Clean over a controlled surface, not the studio floor.
Dry the Interior
Open the shoe, loosen laces or ribbons, and let moisture escape in a ventilated area away from direct heaters, intense sun, pets, and household traffic. Remove inserts only when designed to come out. Do not seal sweaty shoes in plastic or dry them in a clothes dryer. Heat can shrink uppers, weaken glue, distort shape, and harden materials.
Check Ribbons and Fasteners
Smooth ribbons, elastics, laces, buckles, and hook-and-loop closures before packing. Replace stretched, frayed, or poorly attached parts using the fitter’s or teacher’s method. Do not place safety pins where they can open against skin. For pointe shoes, sewing placement and fit should follow qualified instruction rather than trial and error.
Pack Pairs Separately
Use breathable individual bags or compartments so dirty soles do not rub satin, lining, clothing, or another shoe type. Keep left and right together and label only the outer pouch. Store toe pads and personal inserts in their own clean breathable container. Separate damp towels, water bottles, street shoes, cosmetics, and snacks from dance footwear.
Protect Shoes in Travel
Place the shoe compartment where heavy bottles and books cannot crush it. Do not leave the bag in a hot or freezing vehicle. For air travel or a performance, carry critical fitted shoes and accessories when practical rather than checking every pair. Bring the approved maintenance tool, spare fasteners, and a second ready pair when the role requires it.
Use Qualified Repair
Ask a fitter, teacher, cobbler, or manufacturer-approved service whether a separated sole, worn heel, snapped shank, damaged platform, or torn upper can be repaired. General glue, nails, tape, or stitching can change flexibility and create sharp edges. Retire the shoe from dancing until the repair is complete and tested under controlled movement.
Know Replacement Clues
Replacement timing depends on shoe type, dancer, frequency, floor, technique, and manufacturer guidance. Loss of support, unsafe traction, structural breakdown, changed fit, exposed fasteners, or pain are more useful clues than appearance alone. Record purchase and first-use dates. Keep an old pair only for an explicitly safe lower-demand purpose approved by the teacher.
Create a quick pair card kept in the outer pouch: shoe type, size, left-right notes, fitting date, intended classes and floors, approved cleaning method, and repair contact. Do not write medical information on a visible bag tag. Photograph the sole and upper when new under consistent light. Later comparison can reveal stretching or wear, but the teacher or fitter should interpret whether the shoe still performs its intended role.
Once a week, empty the entire dance bag. Vacuum or wipe the bag according to its instructions, wash reusable pouches as allowed, discard food waste, dry bottles, and check for spilled cosmetics or rosin. Do not return clean shoes to a damp compartment. A regular full reset catches the broken elastic, forgotten wet towel, or leaking bottle that a rushed daily pack can miss.
Dance shoe care is mostly moisture control, material-specific cleaning, inspection, and separation. Clean only as directed, air-dry fully, protect fasteners, use breathable pair bags, and ask qualified people about repair or replacement. A tidy dance bag makes the pre-class safety check faster and more reliable.



 Ovations Studios4.0 (9 reviews)
 5678 Dance Studio4.0 (14 reviews)
 Contempo Dance Center5.0 (6 reviews)
 Nupur Dance Academy5.0 (10 reviews)
 Naydenov Gymnastics4.0 (161 reviews)
 Rocky Mountain Conservatory Theatre4.0 (16 reviews)
 What is Pasodoble? The Spanish Bullfight-Inspired Dance
 How to Deal with Sweat and Hygiene in Group Dance Classes | Creative Edge Dance Studio
 How I Chose My First Beginner Dance Style
 How I Balanced Dance & Academic Studies as a Student Dancer in the U.S.
 The Connection Between Dance and Cultural Identity | Embracing Heritage
 How to Learn Choreography Faster and Remember It Longer – Creative Edge Dance Studio