
Dance Studio Barre Etiquette: Spacing, Grip, and Transitions
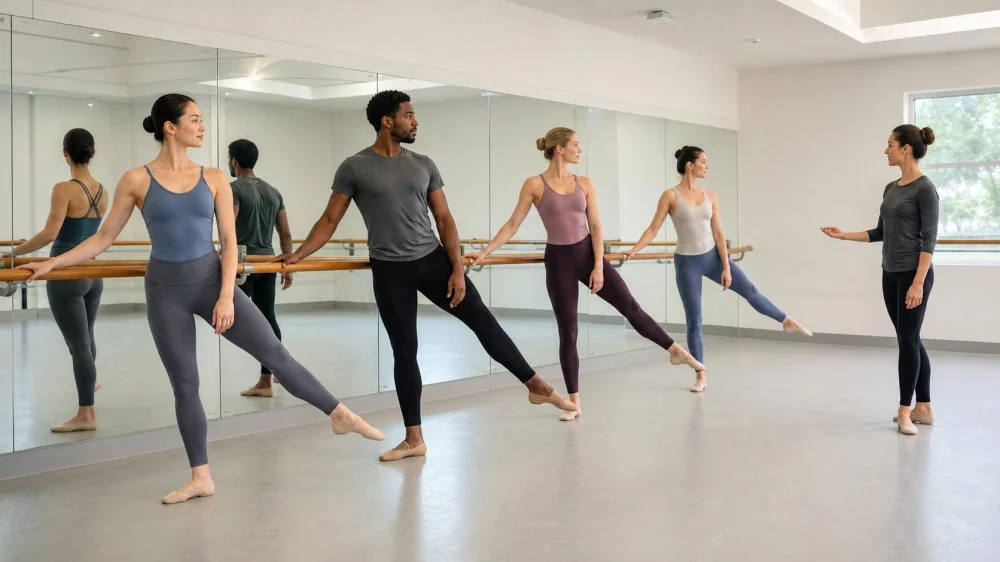
The barre gives dancers a shared reference for balance and placement, but it also creates a narrow working zone where hands, legs, bags, and moving groups can collide. Clear spacing, a light functional grip, and predictable transitions help everyone use the barre without turning it into an obstacle.
Quick answer
Follow the teacher’s placement and direction. Check that the barre is stable and the floor is clear, then leave enough room for your full leg and arm range plus the neighboring dancer’s movement. Rest the hand as taught without leaning, pulling, gripping rigidly, or hanging. Keep belongings away, announce necessary adjustments, and wait for a clear cue before turning, switching sides, or crossing behind another dancer.

Dirty Boots Augusta / dirty boots augusta
917 Broad St, Augusta, GA 30901, USA
Inspect the barre area
Arrive early enough to place bags, bottles, phones, coats, and shoes in the designated storage area. Nothing should sit under the barre or in the path between the barre and center floor. A small object can become a trip hazard during a backward tendu or a group change.
Look for a loose bracket, wobbling portable barre, splinter, sharp edge, wet spot, floor gap, unstable mirror panel, or blocked exit. Do not tighten, move, or repair studio equipment without permission. Tell the teacher or staff and use another space.
Portable barres need special clearance. Their feet extend beyond the rail and can be easy to miss. Use them only in the orientation set by staff, and do not drag them across the floor.

Choose safe spacing
Stand where the teacher assigns you. Extend one arm and test a modest leg path slowly, without entering someone else’s space. The required distance changes with the exercise: plié needs less lateral clearance than grand battement, rond de jambe, a penché, or a traveling transition.
Stagger dancers when the room and teacher allow it so neighboring legs do not share the same line. At a two-sided portable barre, dancers on opposite sides should coordinate positions rather than standing directly across from each other when large movements could meet.
Do not claim space with a towel or bag. If there is not enough safe room, tell the teacher. The solution may be smaller groups, adjusted range, a different direction, or use of center practice.
Use the instructed hand position
The barre is a light support and spatial reference, not a railing for hanging body weight. Place the hand, thumb, wrist, elbow, and shoulder as the teacher cues for one-hand or two-hand work. Avoid squeezing hard, locking the elbow, lifting the shoulder, or pulling the torso toward the barre.
Hand placement should allow the body to organize without distorting alignment. If you must lean to reach, adjust the distance under supervision. Dancers have different arm lengths and proportions; copying another person’s exact foot-to-barre distance may not work.
Keep lotions, oils, food, and sticky products off hands and equipment. If sweat makes the rail slippery, notify the teacher and use the studio’s cleaning method.
Protect the movement zone
Mark the exercise at reduced range when spacing is uncertain. Know whether the working leg moves front, side, back, or through a circle, and check the full pathway before the music starts. Maintain awareness without turning the head so far that alignment changes.
Control the leg both outward and inward. A foot that drops or swings on the return can strike a neighboring dancer or the barre. Reduce height when control, surface grip, or space is limited.
Do not stretch a foot onto the barre, hook a leg over it, sit on it, climb it, or place equipment on it unless the teacher specifically directs an exercise and the barre is designed for that use.
Change sides and groups clearly
Wait until the combination ends and all legs are down. Follow the teacher’s cue to turn in place, rotate around an end, or change to another position. Do not duck under an occupied barre or step through someone’s arm and leg space.
When passing behind dancers, leave room and use a quiet verbal cue if they may not see you. Walk rather than run. Keep the center pathway and exits open.
If the next group enters, the departing group should clear completely before the music begins. Return a portable barre only when staff direct it and enough people are assigned to move it safely.
Handle crowded and shared classes
Use the position assigned by the teacher rather than selecting a preferred mirror view. More experienced dancers can help by modeling traffic cues, but they should not move others physically or override the teacher.
Ask before changing the barre height or orientation. A shared or wall-mounted barre may not be adjustable. If an accessibility need requires a particular position or support, discuss it privately with the studio in advance when possible.
Avoid extended conversation during setup because other dancers need the cues. If someone repeatedly enters your movement zone, pause, lower the leg, and alert the teacher instead of trying to “work around” the collision.
Know what the barre cannot do
The barre does not make a difficult balance, extreme stretch, or painful movement safe. It can hide excessive leaning or let a dancer force turnout and range. Use only the movement the teacher has assigned and that you can control.
Stop for sharp or increasing pain, dizziness, instability, numbness, or a near fall. Do not use the barre to pull through an injury. A loose or falling barre can injure multiple people, so clear the area and notify staff.
Dancers returning after injury, surgery, or a long break may need individual modifications. A healthcare professional and dance teacher can coordinate progression; a generic barre routine cannot diagnose or rehabilitate an injury.
Frequently asked questions
How close should I stand to the barre?
Use the teacher’s alignment and adjust for your proportions. You should not need to lean, reach, or crowd the working leg.
Can I hold the barre tightly for balance?
A rigid grip can add tension and hide balance problems. Use the instructed light contact and reduce the movement if needed.
Who has priority at a crowded barre?
The teacher’s placement and rotation plan. Tell the teacher when there is not enough clearance.
Can I move a portable barre myself?
Only with staff permission and the number of people and method the studio specifies.
Next steps
At the next class, store belongings first, inspect the floor and equipment, and take the assigned spot. Mark the largest leg pathway before starting, use a light teacher-approved grip, and wait for a clear cue before changing sides. Speak up early when space or equipment is unsafe.


 Golden Palace Dance Company0.0 (0 reviews)
 Allison's Dance Academy - Rock Valley4.0 (10 reviews)
 Shake it with Kelly Zumba Fitness4.0 (3 reviews)
 Vibe Performing Arts4.0 (8 reviews)
 Rise MVMT Studio4.0 (10 reviews)
 Foley Academy of Irish Dance5.0 (7 reviews)
 Dance Class With Live Music: Listen for Cues, Tempo, and Phrasing
 How I Learned to Use Virtual Reality Audiences in My Dance Shows — My Story
 How to Track Your Dance Progress Beyond Just Learning Routines
 How I Built My Home Dance Space — Setup, Mistakes & Tips
 How I Learned to Use Drone Footage in My Dance Video — My Story
 10 Benefits of Taking Dance Classes That Go Beyond Just Learning Moves