
- Starting with a Concept: The Idea Behind the Design
- From Sketch to Vision: Creating the Initial Design
- Choosing the Right Fabrics and Materials
- Bringing the Design to Life: Costume Construction
- Adding the Final Touches: Details that Make a Difference
- The Final Product: My Costume on Stage
Starting with a Concept: The Idea Behind the Design
Designing a dance costume begins with a concept. For me, this was an exciting and somewhat challenging process, as it required balancing both functionality and creativity. The first step was to think about the performance itself: What style of dance would it be? What emotions or themes did I want to convey through the costume? These initial questions helped me narrow down my ideas and create a clear vision of what I wanted.
The theme of the performance played a huge role in shaping the design. I wanted a costume that would reflect movement and flow while staying true to the artistic vision of the piece. The colors, textures, and silhouette all had to speak to the energy of the dance, whether it was classical ballet, modern dance, or jazz. This was the foundation that would guide every decision I made from that point on.
Class Act Performing Arts / class act studios
EdgewaterAnne Arundel CountyMaryland
161 Mitchells Chance Rd, Edgewater, MD 21037, USA
From Sketch to Vision: Creating the Initial Design
Once I had a clear concept, I moved on to sketching. This is one of the most crucial steps in the design process because it allows me to visually explore ideas before committing to any fabric or construction. I always start with basic outlines and work my way toward adding details like the neckline, sleeve length, and overall silhouette.
During this stage, I consider the practicality of the design. For example, I make sure there is enough flexibility for the dancer to move comfortably, especially for acrobatic or high-impact routines. At the same time, I want the costume to be visually striking, so I pay special attention to how different elements will flow together on stage.
Sketching also gives me the chance to experiment with color and fabric placement. I choose colors that complement the performance’s mood, and I think about how the costume will look under stage lighting, which can dramatically alter the appearance of fabrics.

Mythili Dance Academy / mythili dance academy
12996 Nimble Dr, Frisco, TX 75035, USA
Choosing the Right Fabrics and Materials
After the sketch is done, the next step is fabric selection. The fabric you choose can make or break the costume. I prefer to use materials that not only look beautiful but also feel comfortable for the dancer to wear throughout the performance.
For my first dance costume, I selected a combination of stretchy fabrics like spandex for flexibility and silk chiffon for flow and movement. The spandex allowed for maximum mobility, while the chiffon added an ethereal quality that enhanced the dancer’s movements. I also made sure to choose fabrics that would hold up well under the wear and tear of a performance, ensuring the costume would stay intact throughout the show.
In addition to function, the fabric needed to have the right aesthetic appeal. The texture and finish of the fabric contribute to the overall look and feel of the costume. I also considered how different fabrics would interact with lighting to ensure the dancer’s movements were highlighted appropriately.
Bringing the Design to Life: Costume Construction
Once the fabrics were selected, it was time for the fun part: constructing the costume. This was the phase where my design really started to come to life. I worked closely with a seamstress to ensure the fit was perfect and that the materials were sewn in a way that would enhance the dancer’s movements.
One important consideration during construction was creating a costume that would stay in place while still allowing freedom of movement. For example, I used stretchy panels in strategic areas to allow for easier bending and stretching, while also reinforcing key seams to prevent any wardrobe malfunctions during the performance.
Another challenge was ensuring the costume was comfortable. After all, the dancer would be wearing it for an extended period, and comfort is key. I paid attention to details like lining, padding, and elasticity, ensuring the costume was both wearable and visually effective.
Adding the Final Touches: Details that Make a Difference
Details can truly elevate a costume, and I spent a lot of time on the final touches. This included adding embellishments like sequins, beads, and metallic accents that would catch the light on stage. These little details added a touch of glamour and sparkle to the design.
Additionally, I added functional elements like straps and fastenings that were both practical and decorative. These small additions helped to complete the look and ensured the costume was as secure as it was stylish.
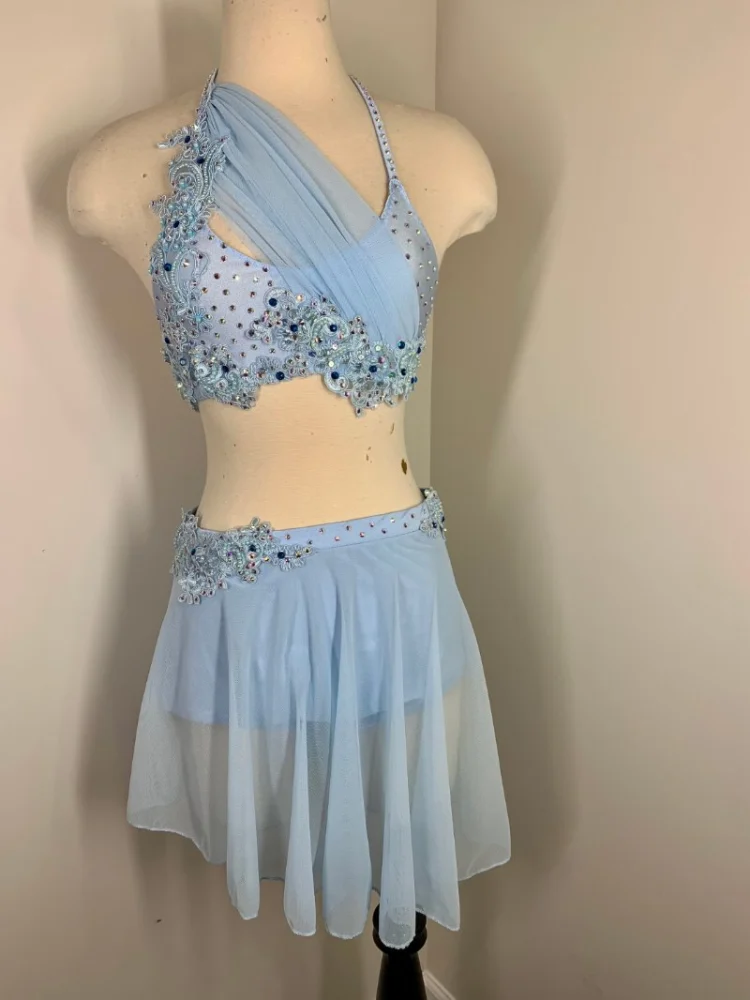
The Final Product: My Costume on Stage
Seeing my design on stage for the first time was an unforgettable experience. All the hours spent sketching, fabric shopping, and stitching came together in a truly magical moment. The costume moved beautifully with the dancer, and the lighting highlighted every detail perfectly. Watching the dancer perform in the costume I had designed made all the effort worthwhile.
If you're interested in learning more about dance costumes or finding inspiration for your own designs, I recommend checking out the resources at Creative Edge Dance Studio. They offer great materials, design tips, and even performance advice to help you with every step of your dance costume creation journey.


 Ni Riain School of Irish Dance5.0 (6 reviews)
 Blanchard School of Dance0.0 (0 reviews)
 Buckshot Saloon4.0 (196 reviews)
 Iron Cross Gymnastics4.0 (94 reviews)
 Kerri's Dance Studio4.0 (35 reviews)
 Emily Coles Dance SF5.0 (7 reviews)
 How I Balanced Ageing and Dance — My Transition Into Mature Dancer Life - Creative Edge Dance Studio
 The Relationship Between Music Theory and Dance
 The Best Dance Workouts for People Who Get Bored at the Gym
 What is Forró? The Brazilian Partner Dance
 My Story of First Time Performing in a Large Theater — The Big Night
 What I Wish I Knew Before Registering for My First Barre Class