
Dance Shoe Sole Check: Clean, Dry, and Studio-Ready
Table of contents
Quick answer
Use the footwear required for the dance style and reserve indoor shoes for the studio when possible. Before stepping onto the floor, check both soles for grit, moisture, gum, oil, loose material, and damage. Brush dry debris into a bin and follow the shoe maker's cleaning guidance. If traction feels unexpectedly slick or sticky during easy steps, stop and ask the instructor before dancing full-out.

Luna Aerial Dance & Performing Arts / luna aerial
FrederickFrederick CountyMaryland
4750 Winchester Blvd #7, Frederick, MD 21703, USA
Confirm the class and studio footwear rules
Footwear that works in one class may be wrong for another. Ballet, tap, jazz, ballroom, hip-hop, contemporary, and barefoot work place different demands on the floor. The same studio may allow dance sneakers in one room, prohibit metal taps in another, and require bare feet or socks for a specific instructor.
Read the class description and studio policy before arriving. Ask whether shoes must be studio-only, which sole materials are permitted, and where outdoor shoes should be stored. Do not wear new footwear onto the floor simply because it is marketed for dance; the studio decides what protects its surface and fits the class.
Steps of Faith Dance Studio / steps of faith celina
695 N Preston Rd Ste 180, Celina, TX 75009, USA
Inspect both soles before entering
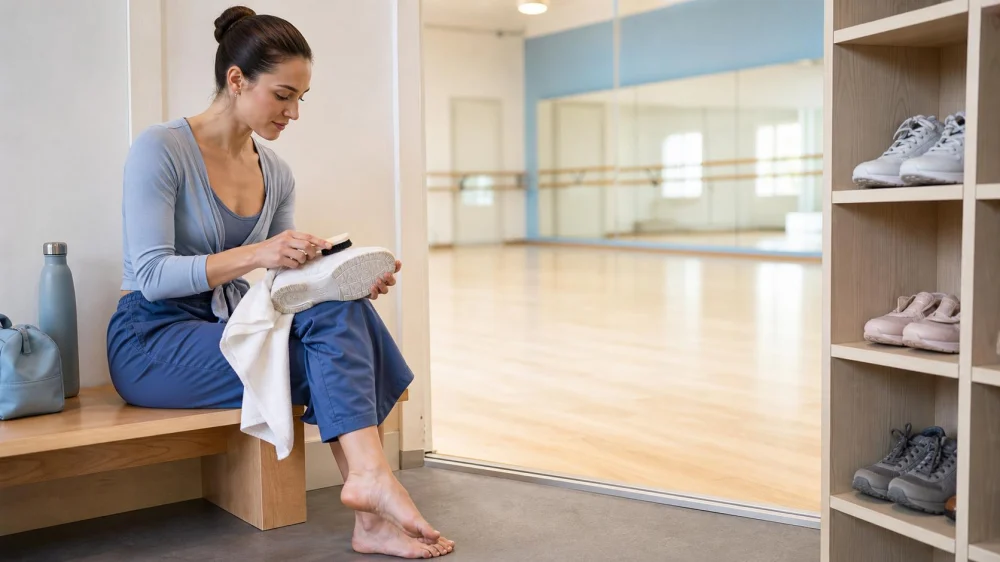
Sit at the changing area or floor boundary and turn each shoe over in good light. Look for:
- sand, small stones, dried mud, or grit caught in tread;
- water, snow, sweat, oil, lotion, or a sticky spot;
- gum, food, tape adhesive, or floor finish residue;
- peeling rubber, a loose suede patch, exposed fastener, or separated heel; and
- an object embedded deeply enough to scratch the floor.
Inspect both shoes even when only one appears dirty. Run a finger near—but not across—a questionable sharp edge. If you find glass, metal, or another hazardous object, keep the shoe off the floor and ask staff how to dispose of or remove it safely.
Remove dry dirt without spreading it
Take the shoe away from the dance surface. Use a dedicated soft brush or dry cloth over a bin or washable entry mat. Work debris out of grooves, then check the edge of the heel and the area under the ball of the foot. Clean the tool afterward and return loose grit to the bin, not the hallway.
Use manufacturer-approved methods for suede, leather, split soles, taps, or specialty materials. Water and household cleaners can harden, swell, stain, dissolve adhesive, corrode metal, or change traction. Never apply rosin, oil, wax, soda, hairspray, or another grip treatment unless the studio explicitly supplies and permits it.
Handle moisture and sticky residue
A wet sole can spread a slippery patch beyond your own feet. If shoes are damp from weather, change into a dry studio pair and leave the wet shoes in the designated area. Blot minor moisture off the floor boundary with the studio's approved material and tell staff if any liquid reached the dance surface.
Do not scrape sticky residue onto the floor or cover it with powder. Remove the shoe and ask whether a safe cleaning method is available. If the sole cannot be restored without a solvent or repair, use an approved alternate shoe or observe the class.
Test traction with simple movement
After the visual check, begin with controlled weight shifts, easy parallel steps, and the class warm-up. Notice whether one foot stops abruptly, slides farther than the other, twists inside the shoe, or makes an unusual sound. Compare the sensation with your normal experience on that specific floor, not with a different studio surface.
Too little traction can allow an uncontrolled slide; too much can interrupt a turn and transfer force upward. Do not test grip with a jump, fast spin, or full traveling combination. If the feel is inconsistent, step off, recheck the sole and floor, and notify the instructor.
Keep the clean-shoe boundary after class
Change back into outdoor shoes before walking through a parking lot, restroom, lobby spill, or wet entrance. Studio-only shoes lose their advantage when worn outside for convenience. Carry them in a breathable or separate shoe compartment so dirt does not move from street footwear onto clean soles.
Allow damp shoes to air-dry at home according to the maker's care instructions. Check for wear before returning them to the bag. This complements shoe storage; it does not replace the quick sole inspection at the next class.
Studio-ready shoe checklist
- The shoe type is approved for today's class and room.
- Outdoor shoes remain outside the dance-floor boundary.
- Both soles are free of grit, stones, gum, and sharp objects.
- The soles are dry and free of oil or sticky residue.
- No sole, patch, heel, tap, or fastener is loose.
- Cleaning follows the manufacturer and studio guidance.
- Easy steps feel even and predictable on both feet.
- Any spill, debris, or traction problem has been reported.
Limits and safety cautions
This guide provides general studio-safety information. Dance style, floor construction, footwear materials, accessibility needs, and instructor requirements vary. The current studio policy and shoe manufacturer's care directions take priority.
A clean sole cannot compensate for a damaged shoe, unsafe floor, unsuitable fit, or an injury. Stop dancing and inform the instructor if the surface is wet, buckled, unusually slick, contaminated, or damaged. Seek qualified evaluation for persistent foot, ankle, knee, or hip pain rather than repeatedly changing traction on your own.
Frequently asked questions
Can I wipe dance shoes with a disinfecting wipe?
Only if the manufacturer permits it for that material. Moisture and chemicals can change suede, leather, adhesive, metal, or rubber. Use the studio's approved method.
Are brand-new soles automatically clean enough?
No. Packaging residue, labels, adhesive, dust, or an incompatible tread can still be present. Inspect new shoes and ask before using them on a specialty floor.
What if my shoes feel sticky only in one corner?
Step away and tell the instructor. The issue may be on the floor rather than the shoe, and continuing can spread contamination or expose other dancers.
Can I wear my dance sneakers from the car to class?
That defeats a studio-only policy. Change at the designated boundary so outdoor grit and moisture do not reach the floor.
Rules and sources
- University of Washington Department of Dance: Dance Studio Guidelines
- Boston University: Dance Program Policies
- UNC Asheville Dance: Studio Safety and Etiquette
- Your studio's current floor policy and the footwear maker's care instructions are the primary sources for a specific shoe and room.
Conclusion and next steps
Build the sole check into the doorway routine: confirm the shoe, inspect both bottoms, remove dry debris, keep moisture off the floor, and test with easy movement. Clean studio footwear protects more than the shoes—it helps every dancer receive a consistent surface under the next step.



 Lyra Noire0.0 (0 reviews)
 Srutilaya School of Dance4.0 (4 reviews)
 South Carolina Summer Dance Conservatory0.0 (0 reviews)
 Fusion Dance4.0 (19 reviews)
 Glenview Park District - Park Center4.0 (102 reviews)
 Dynamic Dance Studio3.0 (3 reviews)
 My Story of Starting a Student-Run Dance Club at College — What I Did
 How to Give Back to the Dance Community as a Student
 How to Find Free Dance Classes at Community Centers: A Step-by-Step Guide
 How I Learned to Use Virtual Space to Perform Live Dance – My Story
 How I Balance Technique vs Creativity in My Choreography Process
 How I Learned to Use AI Choreographers in My Studio — My Story